配置LabVIEW和TortoiseGit工作

配置LabVIEW和TortoiseGit工作

首先安装git for windows和TortoiseGit,都使用默认安装即可.

主要的工作量是在于设置TortoiseGitMerge和TortoiseGitDiff

Config git with labview

https://ispring-cloud-45.ispringcloud.com/acc/kc75hpYxMDM3NA/s/10374-N2ZHD-doaJL-kBQpK

https://forums.ni.com/t5/Example-Program-Drafts/Source-Code-Control-Using-TortoiseSVN-Subversion-with-LabVIEW/ta-p/3510829

Configuring TortoiseGit for Graphical Diff
​ 1. Right-click in Windows Explorer to expose the TortoiseGit options
​ 2. Mouse-over ‘TortoiseGit>> Settings’
​ 3. In the list of settings on the left, select ‘Diff Viewer’,On the right side of the dialog, select ‘Advanced’
​ 4. When the ‘Advanced diff settings’ dialog appears, select ‘Add’
​ 5. In the dialog that appears, type .vi as the extension
​ 6. Where it prompts you for the path to the external program, type the following: “C:\Program Files\National Instruments\Shared\LabVIEW Compare\LVCompare.exe” %mine %base -nobdcosm -nobdpos
​ 7. Repeat this operation for the file-type .ctl
Configuring TortoiseGit for Graphical Merge
​ 1. Right-click in Windows Explorer to expose the TortoiseGit options
​ 2. Mouse-over ‘TortoiseGit>> Settings’
​ 3. In the list of settings on the left, select ‘Merge Tool’ under ‘Diff Viewer’
​ 4. On the right side of the dialog, select ‘Advanced’
​ 5. When the ‘Advanced merge settings’ dialog appears, select ‘Add’
​ 6. In the dialog that appears, type .vi as the extension
​ 7. Where it prompts you for the path to the external program, type the following: “C:\Program Files\National Instruments\Shared\LabVIEW Merge\LVMerge.exe” %base %mine %theirs %merged
​ 8. Repeat this operation for the file-type .ctl

LabVIEW2018_released

又到了5月份一年一度的NI Week,LabVIEW 2018按期正式发布,值得注意的有两点,

Python调用支持

NXG风格的控件

PythonNode_AddTwoDoubIes.vi Front Panel  File Edit View Project Operate Tools Window Help  Overview: Demonstrates how to call a Python function and pass doubles as arguments.  Requirements: Python 2.7 or 3.6 with the same bitness as LabVIEW.  Instructions:  I. Set the Python version to the version of Python you want to execute code in.  2. Run the VI. You should see the result of adding "a" and "b" in the indicator "a + b".  3. See comments on the block diagram of this VI and in "ExamplePythonModuIe.py" for more  cw eca python no e passes argumentSMidhändIesteturn va ues.  In or  Iona o  Python version  error in (no error)  us code  source  error out  us code  sourc

有个大坑,LabVIEW调用的是Python36.dll,导致32bit的LabVIEW只能调32bit的Python,只有64bit的LabVIEW才能调用64bit的Python;绕过的办法是直接用命令行接口调用Python,不过每条命令运行时都要打开Python.exe,运行完之后会关闭Python.

互连接口选板新增Python子选板,可使用它从LabVIEW代码中调用Python代码。Python选板包 含以下函数:

• 打开Python会话-用特定版本的Python打开Python会话。

• Python节点-直接调用Python函数。

• 关闭Python会话-关闭Python会话。

注:必须安装Python 2.7或3.6版本以使用LabVIEW Python函数。尽管不支持的 Python版本可以与LabVIEW Python函数一起使用,但NI建议仅使用支持的Python 版本。访问ni.com/info并输入信息代码python,了解更多关于安装Python的 信息。

NXG风格控件 控件选板包含新的NXG风格前面板控件。使用NXG风格的控件,创建LabVIEWNXG风格的前面 板。控件的外观随终端用户运行VI的平台改变。如果将VI迁移到LabVIEW NXG,使用这些控件可以最大限度地减少前面板的失真。

LabVIEW 2018新增了错误寄存器以简化启用了并行循环的For循环的错误处理。错误寄存器取代了并行For循环上错误簇的移位寄存器,如以下程序框图所示。 图 3 错误寄存器可自动合并并行循环的错误。在For循环上配置并行循环时,LabVIEW将自动把移位寄存器转换为错误寄存器,从而遵循通过移位寄存器传输错误的最佳实践。

针对不同数据类型自定义自适应VI 比较选板新增检查类型子选板。使用“检查类型”VI和函数可强制让自适应VI(.vim)只接受满 足特定要求的数据类型。使用类型专用结构可为指定数据类型自定义自适应VI (.vim)中的代码段。

Errors occurred when open NI DMM Soft Pannel

NI-DMM 软面板出错的解决办法

安装完NI-DMM之后有时打开软面板会提示

ERROR:One or more elements of the application could not be found. Please re-install ni-DMM installer again to fix this problem

NI-DMM Soft Front Panel ERROR: One or more elements of the applicaton could not be found. Please run the NI-DMM installer again to fix this problem

这个可能有以下几种常见原因

第一:NI软件安装时没有使用默认目录,测试至少NI-DMM 16.0存在此问题.

第二:NI-DMM 17.5存在Bug,随机性的打不开软面板,重启后偶尔正常.

第三:DAQmx组件错乱,之前遇到过类似的报错,NI论坛上也是这种错误.

NI-DMM依赖对应版本的DAQmx,比如是安装了低版本ELVISmx导致DAQmx组件版本不匹配,

解决办法是在添加删除程序里选择添加删除NI软件,把低版本的DAQmx组件删除即可.

https://forums.ni.com/t5/PXI/DMM-SFT-returns-error-message-says-to-re-install/td-p/470375

或者最彻底的办法是到 控制面板-添加删除程序-NI软件-删除所有组件.然后安装NI-DMM及内部包含的DAQmx,或者安装NI DeviceDriver Set里面的成套驱动.

给7Zip压缩自动增加时间戳

WinRAR压缩文件有一个很方便的选项是在文件名追加压缩时间,但是RAR是收费软件,价格不菲.使用7-Zip就没有这样的功能了么?

其实只要自己动手也能丰衣足食,给7-Zip加上这个功能:

首先在运行中输入

  1. shell:sendto

打开自己的发送到文件夹.

在文件夹新建一个文本文档,并贴入以下代码保存为ANSI编码

  1. [set](http://search.microsoft.com/default.asp?so=RECCNT&siteid=us%2Fdev&p=1&nq=NEW&qu=set&IntlSearch=&boolean=PHRASE&ig=01&i=09&i=99) hh=%[time](http://search.microsoft.com/default.asp?so=RECCNT&siteid=us%2Fdev&p=1&nq=NEW&qu=time&IntlSearch=&boolean=PHRASE&ig=01&i=09&i=99):~0,2%
  2. [if](http://search.microsoft.com/default.asp?so=RECCNT&siteid=us%2Fdev&p=1&nq=NEW&qu=if&IntlSearch=&boolean=PHRASE&ig=01&i=09&i=99) %hh% LSS 10 ([set](http://search.microsoft.com/default.asp?so=RECCNT&siteid=us%2Fdev&p=1&nq=NEW&qu=set&IntlSearch=&boolean=PHRASE&ig=01&i=09&i=99) hh=0%[time](http://search.microsoft.com/default.asp?so=RECCNT&siteid=us%2Fdev&p=1&nq=NEW&qu=time&IntlSearch=&boolean=PHRASE&ig=01&i=09&i=99):~1,1%)
  3. [set](http://search.microsoft.com/default.asp?so=RECCNT&siteid=us%2Fdev&p=1&nq=NEW&qu=set&IntlSearch=&boolean=PHRASE&ig=01&i=09&i=99) dst=%[date](http://search.microsoft.com/default.asp?so=RECCNT&siteid=us%2Fdev&p=1&nq=NEW&qu=date&IntlSearch=&boolean=PHRASE&ig=01&i=09&i=99):~0,4%%[date](http://search.microsoft.com/default.asp?so=RECCNT&siteid=us%2Fdev&p=1&nq=NEW&qu=date&IntlSearch=&boolean=PHRASE&ig=01&i=09&i=99):~5,2%%[date](http://search.microsoft.com/default.asp?so=RECCNT&siteid=us%2Fdev&p=1&nq=NEW&qu=date&IntlSearch=&boolean=PHRASE&ig=01&i=09&i=99):~8,2%_%hh%%[time](http://search.microsoft.com/default.asp?so=RECCNT&siteid=us%2Fdev&p=1&nq=NEW&qu=time&IntlSearch=&boolean=PHRASE&ig=01&i=09&i=99):~3,2%%[time](http://search.microsoft.com/default.asp?so=RECCNT&siteid=us%2Fdev&p=1&nq=NEW&qu=time&IntlSearch=&boolean=PHRASE&ig=01&i=09&i=99):~6,2%
  4. "C:\Program Files\7-Zip\7z.exe" a %1_%dst%.zip %1

修改文件名为

7zBackup.bat

使用时选中需要压缩的文件或者目录,选择发送到7zBackup.bat即可。

以上在Window 7 64bit,7-Zip 9.2 64bit下验证通过。

NI院校套件批量安装技巧一则

NI院校套件提供了一个很方便的自动安装功能:

  1. 可以自动决定安装顺序
  2. 可以自动确定依赖关系

不过美中不足的是安装Xilinx 10.1编译器的时候还需要手动安装,通过修改安装包,我们也可以自动安装Xilinx 10.1编译器

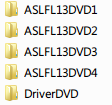
复制或解压4张安装DVD,一张驱动DVD,并按照下图命名


下载Xilinx 10编译器,并解压至:

\ASLFL13DVD2\Distributions\Xilinx 10

修改\ASLFL13DVD1\nisuite.xml 第4072~4082行

  1. <distribution id="XILINX10">
  2.   <inputRoot suiteVolume="5">Windows\Xilinx 10\</inputRoot>
  3.   <installOrder>9998</installOrder>
  4.   <EULAId>None</EULAId>
  5.   <distributionType>ADE</distributionType>
  6.   <displayFolderId>ASLControl</displayFolderId>
  7.   <name language="0009">Xilinx Compilation Tools 10.1 (Requires Additional Xilinx Compilation Tools DVD)</name>
  8.   <description language="0009">You can install these tools locally or on a remote computer.\n\nUse these compilation tools to compile FPGA VIs on NI hardware containing Virtex-II FPGAs, such as the 781xR, 783xR, and cRIO-910x devices.\n\nLearn more about the FPGA on your NI hardware at ni.com.</description>
  9.   <installOptionSetId>NoDefault</installOptionSetId>
  10.   <defaultInstallState>NoInstall</defaultInstallState>
  11. </distribution>

替换为

  1. <distribution id="XILINX10">
  2.   <distId GUID="{C7B4CAC5-4001-475C-967D-DC65C097AA3B}" languages="0009" packageGUID="{1BECF03B-48B7-453F-AEB4-2570F837056B}" version="10.13.0"/>
  3.   <inputRoot suiteVolume="2">Distributions\Xilinx 10\</inputRoot>
  4.   <installOrder>9998</installOrder>
  5.   <EULAId>None</EULAId>
  6.   <distributionType>ADE</distributionType>
  7.   <displayFolderId>ASLControl</displayFolderId>
  8.   <name language="0009">Xilinx Compilation Tools 10.1 (Requires Additional Xilinx Compilation Tools DVD)</name>
  9.   <description language="0009">You can install these tools locally or on a remote computer.\n\nUse these compilation tools to compile FPGA VIs on NI hardware containing Virtex-II FPGAs, such as the 781xR, 783xR, and cRIO-910x devices.\n\nLearn more about the FPGA on your NI hardware at ni.com.</description>
  10.   <installOptionSetId>NoCustomInstall</installOptionSetId>
  11.   <defaultInstallState>NoInstall</defaultInstallState>
  12. </distribution>

今后安装LabVIEW FPGA时,就可以自动安装编译器了.

LabVIEW 2012 使用心得

LabVIEW 2012 自8月发布已有3月有余,总结了一些使用中发现的优缺点:

优点:

  1. 新加的For循环条件自动索引很方便。2. 新项目向导选项很丰富,模板文档很详尽。3. 新加的Actor Frameworks增加了面向对象的通用架构。4. 可以从NI FTP下载院校系使用权套件的安装镜像,方便批量安装。

缺点:

  1. 启动界面层级太多,找东西不方便。2. 项目向导响应有时候非常迟钝。3. LabVIEW 2009的字体BUG重出江湖。4. 不打补丁会出现无法退出的情况。

点评:

这一次LabVIEW更新增加的Actor Framework给LabVIEW提供基于类和对象的架构选择,不过LabVIEW面向对象带来的好处能否超过其成本还需要在实践中验证。

PS:

LabVIEW 字体BUG修正方案

针对LabVIEW图标编辑器,可以考虑关闭系统ClearType(但是字体仍然不对),或者使用我以前写的字体图片

针对LabVIEW环境,目前最治本的办法是将系统非unicode程序语言更换为英文,但是此时LabVIEW里面的中文会乱码,因此对于中国的LabVIEW使用者没有可行性。

升级至TortoiseSVN 1.7.1

在开源界SVN是一个非常有朝气的项目,这个可以从他的版本每两周一个小版本的升级的速度就看出来。

虽然SVN 1.7出来也有一段时间了,不过一直没有太关注过,最近偶然看到SVN新版本的特性,有几项非常实用的功能和更新,所以果断更新到1.7.1。

值得注目的新特性有:

  1. 数据库整合至根目录(终于解决了目录更名错乱的问题!)

  2. 深度支持Windows 7。新增Windows 7库整合,界面支持Windows 7 Aero特效。

  3. 客户端和服务器均向下互兼容,1.7的客户端也可以配合1.6的服务器使用。
    更新要注意的问题:

  4. 升级安装需要安装两次,第二次选择修复。

  5. 工作副本需要升级至新版本,并且无法降级。
    建议升级流程:

  6. 提交所有工作。

  7. 升级SVN(注意要安装一次修复一次!)

  8. 重新下载或者升级工作副本。
    image

https://decibel.ni.com/content/groups/large-labview-application-development/blog/2010/03/29/using-subversion-svn-with-labview

LabVIEW 2011配套驱动下载地址

NI的最新版本LabVIEW 2011已经发布了,配套的驱动也已经出现在NI的FTP。

NI的驱动包目前分为两种:NI设备驱动和系统驱动集。

区别是系统驱动集会有所有PXI板卡尤其是所有RF的板卡的驱动,

而NI设备驱动只有常用的RFSA和RFSG驱动,不过NI设备驱动会有其他总线如USB-8451的驱动。

推荐下载一个系统驱动集+USB-8451这种组合,可以解决大部分NI板卡的驱动问题。

NI Device Drivers 2011.08
http://joule.ni.com/nidu/cds/view/p/id/2602/lang/zhs
http://ftp.ni.com/support/softlib/driver_cd/aug_11/dcd_aug11.zip
系统驱动集 201108
http://download.ni.com/support/fis/sds/2011.08/SDS-Aug11-1.zip
NI-845x 2.0
http://ftp.ni.com/support/softlib/embedded%20networks/I2C_SPI/ni-845x/2.0.0/NI-845x_200.exe

[Code Share]如何用LabVIEW取得计算机主频

大部分Windows下程序都是使用计算机计时器计算CPU主频,(当然也可以跑个算法自己算)最基础的就是这个了:

  • 使用Win32API取频率

好处是功能简单速度快,下面代码没做返回值处理,如果计算机没有高精度计数器(这个可能性比较小)有可能出不来频率,详细可以去看MSDN:

WINAPI QueryPerformanceFrequency

  • .NET&#160; 利用WMI获取系统信息

这个接口是使用系统信息(C:\Windows\System32\msinfo32.exe)能拿到的信息更多,不过方法复杂,速度也慢。

&#160;

System.Management.ManagementObjectSearcher

这两个算法都在Win7 32bit,LabVIEW2009SP1下测试通过。